NRI Account Opening Checklist
A Comprehensive Guide to Opening Bank Accounts as a Non-Resident Indian
Table of Contents
- Introduction
- Types of NRI Accounts
- Documents Required
- Step-by-Step Process by Bank
- Online vs Offline Account Opening
- Video KYC (IPV) Process
- Timeline & Processing Duration
- Initial Funding Requirements
- Common Rejection Reasons & How to Avoid Them
- Bank Comparison Table
- Master Checklist
- Downloadable Checklists
- FAQs
Introduction
As an NRI (Non-Resident Indian), opening a bank account in India is essential for managing finances, receiving remittances, and maintaining your financial connections with India. This comprehensive guide walks you through the entire process, helping you understand different account types, documentation requirements, and the steps involved with major Indian banks.
About NRI Wealth Partners
NRI Wealth Partners is committed to simplifying financial processes for Non-Resident Indians. We provide expert guidance on account opening, investment strategies, tax compliance, and wealth management tailored to NRIs worldwide.
Types of NRI Accounts
Understanding the different account types is crucial before opening an account. Each serves specific purposes based on your financial needs.
1. NRE Account (Non-Resident External)
What is it? An account for NRIs to deposit foreign exchange earnings and keep funds that remain outside India.
Key Features:
- Can accept foreign currency deposits and Indian rupee deposits from foreign sources
- Income earned outside India can be deposited
- Fully repatriable (can take money out of India)
- Tax-free interest income (as per current laws)
- No restrictions on credits/debits
Best For:
- Receiving salary/income from foreign employment
- Keeping foreign earnings separate
- International fund transfers
Tax Treatment:
- Interest income is not subject to Indian tax
- However, verify current regulations as tax laws change
Interest Rates:
- Typically lower than standard accounts (0.5% - 2% on savings)
- Varies by bank and deposit amount
2. NRO Account (Non-Resident Ordinary)
What is it? An account for NRIs to manage income earned within India or from Indian sources.
Key Features:
- Accepts deposits from Indian sources only (rental income, dividends, pensions)
- Can receive remittances from NRE accounts
- Partially repatriable (limited to $1 million per financial year)
- Subject to Indian income tax on interest earned
Best For:
- Managing rental income from Indian property
- Receiving pension payments from India
- Handling income from Indian investments
- Day-to-day transactions in India
Tax Treatment:
- Interest income is taxable in India
- Need to file ITR if income exceeds threshold
- TDS applicable on interest income
Interest Rates:
- Competitive with standard savings accounts (2% - 4%)
- Slightly lower than resident accounts
3. FCNR Account (Foreign Currency Non-Resident)
What is it? Time deposit account in foreign currency for NRIs.
Key Features:
- Fixed deposits in foreign currency (USD, EUR, GBP, JPY, etc.)
- Tenor: 1-5 years
- Fully repatriable
- Fully hedged against currency fluctuation
- Interest is paid in the currency deposited
Best For:
- Parking foreign currency funds
- Earning returns in stable currencies
- Long-term foreign currency savings
- Risk-averse investors
Tax Treatment:
- Interest income subject to Indian tax
- TDS applicable
- Repatriation of principal is tax-free
Interest Rates:
- Fixed rates based on currency and tenor
- Typically 1-3% depending on currency and tenure
- Change periodically based on RBI rates
Documents Required
Primary Identity & Verification Documents
1. Passport
Requirement: Copy of ALL pages (not just first and last page)
- Cover page
- Bio-data page
- Pages with visa stamps
- Passport validity page
- Any endorsement pages
Checklist:
- Colored photocopy of all pages (front and back)
- Certified copy by notary or embassy (some banks require)
- Passport must be valid for at least 6 months
2. Visa / Work Permit
Requirement: Copy of visa page and permit if applicable
Checklist:
- Current visa stamp copy
- Work permit copy (if on work visa)
- Entry stamp in passport
- Residence permit in country of residence (if different from visa country)
3. PAN Card (Permanent Account Number)
Requirement: Copy of PAN card or valid tax identification
Checklist:
- Self-attested photocopy of PAN card
- If no PAN: Form 60 / Undertaking
- PAN certificate from Indian Income Tax Department (optional but helpful)
Address Proof Documents
4. Foreign Address Proof
Requirement: Proof of current residential address abroad
- Valid for at least 3-6 months from application date
Acceptable Documents:
- Utility bill (electricity, gas, water) - Not more than 2-3 months old
- Rental agreement or lease deed
- Employment letter with address
- Bank statement from foreign bank
- Insurance policy document
- Visa/Passport showing address
- Government-issued ID with address
- Telecom bill (mobile/internet)
Note: Document must show:
- Your full name
- Complete residential address
- Date of issuance
- Clearly printed
5. Indian Address Proof
Requirement: If you have property or relatives in India
Acceptable Documents:
- Property deed/registration
- Rental agreement
- Aadhaar card
- Utility bill from Indian address
- Family member's address proof with authorization letter
- Hotel booking for stay duration
Photographs
6. Passport-Size Photographs
Requirement: Recent colored photographs
Specifications:
- 4 x 6 cm or 2 x 2 inches
- Colored (not black & white)
- Recent (taken within 6 months)
- White background
- Clear face visible
- Quantity: Usually 2-4 copies (check with bank)
- Both sides of photo should be same
Signature & Verification
7. Signature Verification
Requirement: Authorized signature verification
Methods:
- Notary public attestation of signature
- Embassy/Consulate certification
- Bank manager certification (from foreign bank)
- Passport signature verification
- Video KYC signature verification
8. Self-Declaration/Undertaking
Requirement: Notarized self-declaration
Should Include:
- Your full legal name
- Passport number
- Date of birth
- Current address abroad
- Indian address (if applicable)
- Nature of activity/employment
- Contact information
- Declaration of tax residency
- Signature (notarized/attested)
Additional Documents (As Per Requirement)
9. For Salaried NRIs
- Salary certificate from employer
- Appointment letter
- Last 2-3 months salary slips
- Employment contract copy
10. For Self-Employed/Business NRIs
- Business registration documents
- Tax returns (2-3 years)
- Business license
- Partnership deed (if applicable)
- Incorporation certificate
11. For Pensioners
- Pension certificate/letter
- Bank statement showing pension deposits
- Pensioner ID (if issued)
12. For Students/Dependents
- Student ID
- University enrollment letter
- Sponsor's documents
- Financial support letter
Step-by-Step Process by Bank
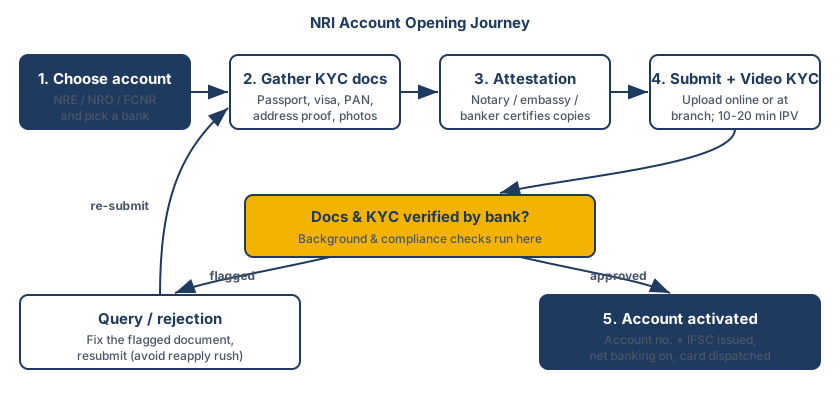
Regardless of which bank you choose, the journey follows the same five stages. The diagram below shows the full path, including what happens if the bank flags a document during verification.
ICICI Bank NRI Account Opening
Online Process (Recommended)
Step 1: Visit ICICI Bank Website
- Go to www.icicibank.com
- Click on "Open Account Online"
- Select "NRI Account" option
Step 2: Initial Application
- Select account type (NRE/NRO)
- Enter passport details
- Provide personal information
- Select preferred branch in India
- Choose account variant (Savings/Salary/Premium)
Step 3: Document Upload
- Upload passport (all pages)
- Upload visa/work permit
- Upload PAN or Form 60
- Upload foreign address proof
- Upload photographs
- Upload signature document
Step 4: Video KYC Appointment
- Select convenient date and time
- Receive Video KYC link via email
- Attend scheduled call with ICICI representative
- Verify documents and signature
- Duration: 10-15 minutes
Step 5: Account Activation
- Receive confirmation email
- Account activated within 2-3 working days
- Access online banking via ICICI iMobile
- Set up login credentials
- Receive debit card at India address
Timeline: 5-7 business days Processing Fee: Free
Offline Process (At Branch)
Step 1: Visit Nearest ICICI Branch
- Locate ICICI branch in India
- Contact branch manager
- Request NRI account opening forms
Step 2: Form Submission
- Complete KYC Form (Form A)
- Complete Know Your Customer Form
- Provide documents in person
- Get documents verified by branch manager
Step 3: Video Verification
- Some branches still conduct in-person verification
- Signature verification by branch staff
- Document verification and attestation
Step 4: Processing
- Branch sends documents to processing center
- Background verification
- Account activation
Step 5: Account Delivery
- Debit card and checkbook sent to registered address
- Login credentials via email/SMS
- Start using account
Timeline: 7-10 business days Processing Fee: Free
ICICI NRI Account Features:
- Competitive interest rates on NRE accounts
- Free NEFT/RTGS up to certain limits
- Mobile banking via iMobile app
- 24/7 customer support
- Emergency cash withdrawal abroad (ICICI Global ATM Network)
HDFC Bank NRI Account Opening
Online Process (iWealth)
Step 1: Access HDFC iWealth
- Visit www.hdfcbank.com/nri
- Click "Open NRI Account Now"
- Select account type and features
Step 2: Personal Information
- Enter full name as per passport
- Provide passport number
- Select country of residence
- Enter contact details
- Provide email and phone number
Step 3: Address & Employment Details
- Enter foreign address
- Enter Indian address (if applicable)
- Specify employment details
- Provide occupation and income range
- Select source of funds
Step 4: Document Upload Portal
- Access secure document upload portal
- Upload passport (colored, all pages)
- Upload visa details
- Upload PAN or equivalent
- Upload address proofs (both foreign and Indian)
- Upload photographs
- Upload income documents (optional)
Step 5: Video Verification (iKYC)
- Schedule video KYC appointment
- Receive meeting link via email
- Join video call with HDFC officer
- Live document verification
- Signature verification
- Duration: 15-20 minutes
Step 6: Approval & Activation
- Receive approval notification
- Account created within 1-2 working days
- Debit card ordered to India address
- Online banking activated
- Access via HDFC MobileApp
Timeline: 4-6 business days Processing Fee: Free
Offline Process
Step 1: Contact HDFC Branch
- Visit nearest HDFC branch
- Meet NRI specialist
- Request account opening package
Step 2: Complete Documentation
- Fill KYC form (Form KYC-01)
- Complete Declaration form
- Provide required documents
- Get documents attested if needed
Step 3: In-Person Verification
- Branch manager reviews documents
- Identity verification
- Address verification
- Signature verification
Step 4: Processing
- Documents processed at branch level
- Forwarded to processing center
- Background checks completed
- Account activation approved
Step 5: Account Delivery
- Debit card sent to registered address
- Checkbook issued
- Welcome kit received
- Start banking operations
Timeline: 7-10 business days Processing Fee: Free
HDFC NRI Account Features:
- Premium iWealth services
- Priority customer service
- Relationship manager for premium tiers
- Exclusive investment products
- Cross-border payment solutions
Axis Bank NRI Account Opening
Online Process (Axis Bank Portal)
Step 1: Visit Axis Bank Website
- Go to www.axisbank.com
- Navigate to "NRI Services"
- Click "Open NRI Account"
Step 2: Account Type Selection
- Choose between NRE/NRO/FCNR
- Select account variant
- Choose preferred branch
- Select online/offline KYC
Step 3: Application Form
- Enter personal details
- Provide passport information
- Enter country details
- Fill employment information
- Specify account purpose
Step 4: Document Submission
- Upload passport copy
- Upload visa details
- Upload PAN
- Upload foreign address proof
- Upload photograph
- Submit supporting documents
Step 5: Video KYC Scheduling
- Choose date and time for Video KYC
- Receive confirmation and video link
- Join meeting at scheduled time
- Complete verification process
- Signature attestation
Step 6: Account Approval
- Account approved and created
- Receive account number
- Online banking activated
- Debit card sent to address
Timeline: 5-8 business days Processing Fee: Free
Axis Bank NRI Account Features:
- Competitive interest rates
- Easy fund transfers via NEFT/RTGS
- Forex card for international transactions
- Multi-currency accounts available
- 24/7 customer support
SBI NRI Account Opening
Online Process (SBI NRI Portal)
Step 1: Access SBI Website
- Visit www.sbi.co.in
- Go to "NRI" section
- Click "Account Opening"
Step 2: Selection Process
- Choose account type (NRE/NRO/FCNR)
- Select preferred branch
- Choose account variant
- Select online KYC option
Step 3: Application Details
- Fill application form
- Enter personal information
- Provide passport details
- Enter residence details
- Mention occupation and income
Step 4: Document Upload
- Upload passport (all pages)
- Upload visa/work permit
- Upload PAN or Form 60
- Upload foreign address proof
- Upload Indian address proof
- Upload photographs
- Upload signature document
Step 5: Video Verification (VKYC)
- Slot booking for video call
- Receive unique meeting link
- Join call with SBI officer
- Document verification
- Signature verification
- Duration: 10-15 minutes
Step 6: Completion
- Account approved
- Receive welcome kit
- Debit card dispatched
- Online banking credentials sent
- Account ready for operations
Timeline: 5-7 business days Processing Fee: Free
Offline Process (At Branch)
Step 1: Visit SBI Branch
- Locate SBI NRI branch in India
- Contact branch NRI specialist
- Request account opening packet
Step 2: Form Completion
- Complete KYC form
- Complete declaration form
- Attach all required documents
- Get originals verified
Step 3: Verification Meeting
- Meet with branch officer
- Live document verification
- Identity and address confirmation
- Signature verification
Step 4: Submission & Processing
- Documents submitted
- Application forwarded to main office
- Background verification
- Final approval
Step 5: Delivery
- Account created
- Debit card sent
- Checkbook issued
- Online banking activated
Timeline: 8-12 business days Processing Fee: Free
SBI NRI Account Features:
- Largest network of branches
- Affordable charges and fees
- Easy remittance options
- Government salary accounts available
- Strong ATM network worldwide
Kotak Bank NRI Account Opening
Online Process
Step 1: Kotak Website
- Visit www.kotak.com
- Navigate to "NRI Services"
- Select "Open NRI Account"
Step 2: Account Configuration
- Choose account type
- Select branch location
- Pick account variant
- Choose service level
Step 3: Personal Information
- Enter full name
- Provide passport number
- Enter date of birth
- Provide contact details
- Fill employment details
Step 4: Documentation Upload
- Upload passport
- Upload visa
- Upload PAN
- Upload address proofs
- Upload photographs
- Upload income documents
Step 5: Video KYC
- Schedule video verification
- Receive meeting details
- Complete video KYC
- Signature verification
Step 6: Activation
- Account approved
- Online banking enabled
- Debit card dispatched
- Start transactions
Timeline: 6-8 business days Processing Fee: Free
Kotak Bank NRI Account Features:
- Personalized service
- Premium banking options
- Investment advisory services
- Wealth management solutions
- Exclusive offers and benefits
Online vs Offline Account Opening
Online Account Opening
Advantages:
- Faster processing (5-8 business days)
- Convenient from anywhere
- Can apply without visiting India
- No need for local representative
- Instant documentation through secure portal
- Video KYC from home/office
- Real-time status tracking
- Lower paperwork
- Environmentally friendly
- Reduced processing errors
Disadvantages:
- Internet connectivity required
- Video KYC at specific times
- Technical issues possible
- Limited direct interaction
- Document quality requirements higher
- Some documents must be scanned
- Time zone challenges for video calls
Best For:
- Busy professionals
- Those living far from India
- First-time NRI account openers
- Tech-savvy individuals
- Quick account setup needed
Offline Account Opening
Advantages:
- Personal interaction with bank staff
- Direct document verification
- Immediate answers to questions
- Face-to-face relationship building
- Physical document submission
- Can carry original documents
- Relationship manager assigned
- Better for complex situations
- Trust factor higher
Disadvantages:
- Longer processing time (8-12 days)
- Must visit India branch
- Limited branch access (for NRIs)
- More paperwork involved
- Multiple visits sometimes required
- Higher documentation burden
- Dependence on branch hours
- Travel expenses
Best For:
- Those planning to visit India
- Complex financial situations
- Preference for personal service
- Those unfamiliar with digital process
- Larger deposits/complex requirements
Recommendation
For Most NRIs: Online account opening is recommended as it's faster, more convenient, and equally secure.
Prerequisites for Online:
- Valid passport with scan copies of all pages
- Clear photographs (digital or scanned)
- Stable internet connection
- Suitable location for video KYC
- Valid email and phone number for communication
Video KYC (IPV) Process
Video KYC (Know Your Customer) or IPV (In-Person Verification) is now the standard method for NRI account opening.
What is Video KYC?
Video KYC is a remote video-based verification process where you meet a bank representative virtually to verify your identity and documents.
Process Overview
Step 1: Schedule Appointment (1-2 days before)
- Select suitable date and time
- Receive confirmation email
- Get unique video meeting link
- Set reminder for appointment
Step 2: Prepare Documents (1 day before)
- Keep passport ready
- Keep visa copy handy
- Keep address proof accessible
- Have PAN/Form 60 available
- Keep photographs nearby
- Have pen ready for signature
Step 3: Technical Setup (30 minutes before)
- Test internet connection
- Ensure good lighting
- Use clean, white background
- Position camera at eye level
- Check device microphone and camera
- Close background applications
- Have phone/computer fully charged
- Remove sunglasses/hat
Step 4: Video Call Execution (10-20 minutes)
- Join video call 5 minutes early
- Greet the verification officer
- Show your face clearly (no masks)
- Display documents on camera
- Passport verification
- Show all pages of passport
- Officer captures images
- Officer asks questions about details
- Visa verification
- Show visa pages
- Explain employment details
- Show entry/exit stamps if available
- Address proof verification
- Show foreign address document
- Show Indian address proof if applicable
- Officer notes details
- Signature verification
- Officer asks you to sign on paper
- Display signature on camera
- Sign multiple times for verification
- Personal questions
- Confirm your details
- Verify contact information
- Confirm income details
- Answer compliance questions
Step 5: Completion
- Officer confirms verification complete
- Receive confirmation message
- Account processed within 2-3 days
- Notification of account activation
Video KYC Requirements
Technical Requirements:
- Smartphone or computer with camera
- Stable internet (Wi-Fi or 4G)
- Video calling software (usually browser-based)
- Good lighting (natural or artificial)
- Quiet environment with minimal background noise
Document Requirements:
- Valid passport (can be held in hand)
- Visa/work permit copy
- Address proof
- PAN or equivalent
- Notarized signature document
Environment Requirements:
- Clean, well-lit room
- White or neutral background
- No interruptions
- Professional appearance
- Clear audio quality
Tips for Successful Video KYC
-
Preparation
- Be 10 minutes early to the call
- Keep all documents within reach
- Keep passport valid and accessible
- Practice showing documents on camera
-
During Call
- Speak clearly and slowly
- Make eye contact with camera
- Keep documents visible as instructed
- Answer all questions directly
- Don't be nervous - it's routine
-
Common Questions Asked
- "What is the purpose of opening account?"
- "What is your current employment?"
- "What is your monthly income?"
- "What are the sources of funds?"
- "Will you be remitting money to India?"
- "Do you have any other bank accounts?"
- "What is your tax residency status?"
-
Post-Call
- Wait for account confirmation
- Don't assume account is ready immediately
- Check email for updates
- Contact bank if no update in 3 days
Timeline & Processing Duration
Online Account Opening Timeline
| Step | Activity | Duration |
|---|---|---|
| 1 | Application submission | Same day |
| 2 | Initial document review | 1-2 hours |
| 3 | Video KYC appointment scheduling | 1-2 days |
| 4 | Video KYC execution | 15 minutes |
| 5 | Document verification | 1-2 days |
| 6 | Background checks | 1-2 days |
| 7 | Account creation | Same day after approval |
| 8 | Online banking activation | 1 day |
| 9 | Debit card dispatch | 5-7 days |
| Total | 5-8 business days |
Offline Account Opening Timeline
| Step | Activity | Duration |
|---|---|---|
| 1 | Branch visit and form submission | 1-2 days |
| 2 | Document verification at branch | 2-3 days |
| 3 | Send to processing center | 1 day |
| 4 | Central verification | 2-3 days |
| 5 | Background checks | 2-3 days |
| 6 | Account creation approval | 1 day |
| 7 | Account creation | Same day |
| 8 | Debit card printing and dispatch | 5-7 days |
| Total | 8-12 business days |
Factors Affecting Timeline
Can Speed Up Processing:
- Complete and accurate documentation
- Clear document scans (for online)
- Timely response to bank queries
- Standard employment (Salaried vs Self-employed)
- Regular account purpose
- Existing bank customer
- High creditworthiness
Can Slow Down Processing:
- Incomplete documentation
- Poor quality documents
- Delayed video KYC appointment
- Unclear address information
- Additional verification needed
- Background check complications
- Document authentication issues
- RBI compliance flags
Timeline by Bank
| Bank | Online Process | Offline Process | Fastest Overall |
|---|---|---|---|
| ICICI | 5-7 days | 7-10 days | 5-7 days |
| HDFC | 4-6 days | 7-10 days | 4-6 days |
| Axis | 5-8 days | 8-12 days | 5-8 days |
| SBI | 5-7 days | 8-12 days | 5-7 days |
| Kotak | 6-8 days | 8-10 days | 6-8 days |
The chart below plots the upper end of each timeline range, making it easy to see how much faster the online route is than visiting a branch.
Account Opening Timeline by Bank (worst-case days)
Upper bound of each bank's stated range; actual timelines depend on documentation completeness
Initial Funding Requirements
Minimum Opening Balance
Most NRI accounts require a minimum opening balance, though it varies by bank and account type.
By Account Type
NRE Account (Foreign Currency):
- ICICI: Rs. 5,000 - 10,000
- HDFC: Rs. 5,000
- Axis: Rs. 5,000 - 10,000
- SBI: Rs. 0 - 5,000
- Kotak: Rs. 5,000
NRO Account (Indian Currency):
- ICICI: Rs. 5,000 - 25,000
- HDFC: Rs. 5,000 - 10,000
- Axis: Rs. 5,000 - 10,000
- SBI: Rs. 0 - 10,000
- Kotak: Rs. 5,000 - 25,000
FCNR Account (Fixed Deposits):
- Minimum deposit amount: $1,000 to $5,000 equivalent
- Currency: USD, EUR, GBP, JPY
- Tenor: 1-5 years
By Account Variant
Premium/Priority Accounts:
- Higher minimum balance requirements
- May require 1-2 lakhs (Rs. 100,000 - 200,000)
- Enhanced benefits justify higher balance
- Waived for certain conditions
Standard Savings Accounts:
- Lower minimum balance
- Rs. 5,000 - 10,000 typically
- Monthly average balance maintained
- Penalty for non-compliance
How to Fund the Account
Methods of Depositing Initial Funds:
-
International Wire Transfer (SWIFT)
- Initiate from foreign bank account
- Provide account details to foreign bank
- Use SWIFT code of Indian bank
- Transfer can take 3-5 business days
- Some banks waive charges
-
NEFT/RTGS (Domestic Transfer)
- Transfer from other Indian accounts
- Faster processing (same day)
- Lower charges than SWIFT
- Available during banking hours
-
Demand Draft
- Get DD from foreign bank
- Mail to branch or deposit in person
- Takes 1-2 weeks for clearance
- Less common now
-
Cheque Deposit
- Deposit cheque from other Indian account
- Takes 2-3 days for clearance
- Limited to domestic only
- Rarely used for new accounts
-
Cash Deposit
- Deposit in person at branch
- Only if you can visit India
- Immediate availability
- Documentation required for large amounts
Opening Balance vs Ongoing Balance
Important Distinction:
- Opening Balance: Only needed at account opening
- Ongoing/Minimum Balance: Maintain after opening
- Failure to maintain minimum balance:
- Monthly charges imposed
- Account can be dormant
- Services restricted
Minimum Balance Requirements (Monthly):
| Bank | Premium | Savings | Basic |
|---|---|---|---|
| ICICI | Rs. 1,00,000+ | Rs. 10,000 - 25,000 | Rs. 0 (no benefits) |
| HDFC | Rs. 1,50,000+ | Rs. 10,000 - 50,000 | Rs. 0 |
| Axis | Rs. 1,00,000+ | Rs. 10,000 - 25,000 | Rs. 0 |
| SBI | Rs. 1,00,000+ | Rs. 5,000 - 25,000 | Rs. 0 |
| Kotak | Rs. 1,50,000+ | Rs. 25,000 - 50,000 | Rs. 0 |
Exemptions & Waiver Options
Conditions for Waiver:
- Direct salary credits
- Senior citizens (60+ years)
- Pensioners with regular pension credits
- Students (with proof)
- Dormant account holders (1-2 accounts)
- Very senior customers (20+ years)
Premium Features at Lower Balance:
- Some banks offer premium features even below standard minimums
- Requires maintaining specific monthly average
- May have different charge structure
- Ask about options at account opening
Common Rejection Reasons & How to Avoid Them
Understanding why applications get rejected helps you prepare better documentation.
Top 10 Rejection Reasons
1. Incomplete or Incorrect Documentation
Why It Happens:
- Missing pages of passport
- Blurry or poor quality scans
- Incorrect information on forms
- Missing signature on documents
How to Avoid:
- Scan all passport pages clearly (colored)
- Proofread all information before submission
- Ensure signatures are consistent
- Keep extra scans of all documents
- Use high-quality scanner or camera
- Provide documents in exact required format
2. Address Verification Issues
Why It Happens:
- Foreign address doesn't match visa details
- Address proof document unclear
- Discrepancy between stated address and documents
- Address proof older than 3 months
How to Avoid:
- Ensure address proof is recent (within 3 months)
- Address should match visa/passport if possible
- Provide multiple address proofs if questioned
- If address changes, update with bank
- Get employer letter with address
- Keep utility bills up-to-date
3. Visa/Employment Issues
Why It Happens:
- Visa type doesn't match occupation
- Work permit not provided for work visa
- Employment verification fails
- Unstable employment pattern
How to Avoid:
- Provide employment contract copy
- Get employer verification letter
- Show visa matching employment type
- Provide reference from employer
- Include appointment letter
- Document stable work history
4. PAN Card Issues
Why It Happens:
- No PAN for Indian citizen
- Cannot verify PAN details
- PAN mismatch with name
How to Avoid:
- Obtain Indian PAN before opening account (if possible)
- If no PAN, submit Form 60 with affidavit
- Ensure name matches PAN exactly
- Get PAN certificate if available
- Provide tax return if PAN exists
- Keep PAN copy attested by notary
5. Source of Funds Unclear
Why It Happens:
- Cannot explain fund source
- Funds appear suspicious
- Large deposits without documentation
- Inconsistency in stated income
How to Avoid:
- Document salary deposits clearly
- Explain remittance source in detail
- Provide bank statements showing steady income
- Submit salary certificates
- Document business income if self-employed
- Keep records of all fund sources
- Avoid cash deposits initially
6. KYC Information Mismatch
Why It Happens:
- Information doesn't match documents
- Date of birth inconsistency
- Name spelling variations
- Contact details mismatched
How to Avoid:
- Fill forms exactly as per passport
- Ensure name consistency across documents
- Use same date of birth format
- Verify contact details before submission
- Don't use nicknames or abbreviations
- Check all details before video KYC
7. Residence/Tax Status Issues
Why It Happens:
- Cannot verify NRI status
- Recent movement to foreign country
- Unclear tax residency status
- Residency in non-recognized country
How to Avoid:
- Provide clear evidence of foreign residence
- Get tax residency certificate if needed
- Document employment in foreign country
- Explain reason for moving abroad
- Provide multiple residence documents
- Get affidavit if status unclear
8. Age Verification Issues
Why It Happens:
- Applicant appears to be minor
- Age inconsistency in documents
- Below 18 years old (needs guardian)
- Above 70 years (additional health requirements)
How to Avoid:
- Ensure age is clearly 18+ years
- Passport shows consistent age
- Birth certificate if age questioned
- For minors, guardian account needed
- For senior citizens, health certificate if needed
- Document age clearly in video KYC
9. Sanctioned Country/Person List (OFAC/UN)
Why It Happens:
- Name similarity with sanctioned list
- Previous connections to restricted countries
- Compliance system flags
How to Avoid:
- This is automatic RBI/bank check
- Ensure no criminal record
- Avoid countries with travel warnings
- If flagged, provide explanation
- Contact bank for clarification
- Can appeal if name is similar
10. Poor Video KYC Execution
Why It Happens:
- Unstable internet during call
- Unclear document display
- Suspicious behavior during verification
- Incomplete information provided
- Background too cluttered
- Unable to verify signature
How to Avoid:
- Test internet connection beforehand
- Use strong Wi-Fi or 4G signal
- Ensure documents are clear
- Sit in professional setting
- Have steady hand when showing documents
- Speak clearly and confidently
- Prepare answers to likely questions
- Be available and attentive during call
Rejection Appeals Process
If Application is Rejected:
-
Immediate Steps:
- Ask for specific rejection reason
- Request written rejection letter
- Get clarity on what went wrong
- Don't reapply immediately
-
Document Review:
- Check which document was issue
- Assess quality of submissions
- Look for inconsistencies
- Fix identified problems
-
Reapplication:
- Correct the problem areas
- Submit fresh application
- Include covering letter explaining corrections
- Choose same or different bank
- Wait 7-10 days before reapplying
-
Escalation:
- Request manager review if needed
- Provide additional explanation
- Escalate through bank's grievance cell
- Request appeal hearing
Bank Comparison Table
Quick Comparison
| Feature | ICICI | HDFC | Axis | SBI | Kotak |
|---|---|---|---|---|---|
| Online Account Opening | Yes | Yes | Yes | Yes | Yes |
| Video KYC Available | Yes | Yes | Yes | Yes | Yes |
| Opening Timeline | 5-7 days | 4-6 days | 5-8 days | 5-7 days | 6-8 days |
| Minimum Opening Balance | Rs. 5,000-10,000 | Rs. 5,000 | Rs. 5,000-10,000 | Rs. 0-5,000 | Rs. 5,000 |
| Interest Rate (NRE) | 0.5-2% | 0.5-2% | 0.5-2% | 0.5-2% | 0.5-2% |
| Interest Rate (NRO) | 2-4% | 2.5-4% | 2-4% | 2-4% | 2.5-4% |
| Monthly Maintenance | Rs. 0-500 | Rs. 0-400 | Rs. 0-300 | Rs. 0-300 | Rs. 0-600 |
| NEFT/RTGS Charges | Free/Charged | Free/Charged | Free/Charged | Free/Charged | Charged |
| Debit Card Annual Fee | Free/Charged | Free | Free | Free | Charged |
| International Debit Card | Yes | Yes | Yes | Yes | Yes |
| Forex Card Available | Yes | Yes | Yes | Yes | Yes |
| Global ATM Network | Large | Large | Large | Largest | Medium |
| Mobile App Rating | 4.2 | 4.3 | 4.0 | 3.9 | 4.1 |
| Customer Service | Good | Excellent | Good | Good | Good |
| Premium Account | iWealth | iWealth | Priority | Advantage | Premium |
| Minimum for Premium | Rs. 1,00,000+ | Rs. 1,50,000+ | Rs. 1,00,000+ | Rs. 1,00,000+ | Rs. 1,50,000+ |
Detailed Feature Comparison
Account Type Availability
| Account Type | ICICI | HDFC | Axis | SBI | Kotak |
|---|---|---|---|---|---|
| NRE | Yes | Yes | Yes | Yes | Yes |
| NRO | Yes | Yes | Yes | Yes | Yes |
| FCNR | Yes | Yes | Yes | Yes | Yes |
| NRI Salary Account | Yes | Yes | Yes | Yes | Yes |
| Joint Account | Limited | Yes | Yes | Yes | Limited |
Services Available
| Service | ICICI | HDFC | Axis | SBI | Kotak |
|---|---|---|---|---|---|
| Online Banking | Yes | Yes | Yes | Yes | Yes |
| Mobile App | Yes | Yes | Yes | Yes | Yes |
| SWIFT Transfers | Yes | Yes | Yes | Yes | Yes |
| NEFT/RTGS | Yes | Yes | Yes | Yes | Yes |
| Cheque Facilities | Yes | Yes | Yes | Yes | Yes |
| Locker Facility | Yes | Yes | Yes | Yes | Yes |
| Investment Options | Yes | Yes | Yes | Yes | Yes |
| Loan Facilities | Limited | Yes | Limited | Yes | Limited |
Which Bank is Best For...
Best for Speed:
- HDFC Bank - 4-6 days for online account opening
- Fastest approval process
- Efficient documentation review
Best for Global Network:
- SBI - Largest ATM and branch network worldwide
- Most widely accepted internationally
- Best for frequent travelers
Best for Premium Services:
- HDFC Bank - iWealth premium offerings
- Dedicated relationship managers
- Exclusive investment options
Best for Affordability:
- SBI - Lowest charges and fees
- No opening balance required
- Most affordable premium account
Best for Tech-Savvy Users:
- ICICI Bank - Excellent mobile app
- Advanced online features
- iMobile platform
Best for Customer Service:
- HDFC Bank - Highest rated customer service
- Responsive support team
- Multiple contact channels
Best for Joint Accounts:
- HDFC Bank - Easier joint account opening
- Better NRI-resident joint account options
Best for Salary Account:
- SBI - Government salary accounts
- Special provisions for government employees
Best for Forex Services:
- HDFC Bank - Comprehensive forex solutions
- Better forex card rates
- Cross-border payment expertise
Best for Remittances:
- ICICI Bank - Efficient remittance process
- Competitive exchange rates
- Fast credit to account
Master Checklist
Use this comprehensive checklist to ensure you have everything ready before applying.
Pre-Application Checklist
General Preparation:
- Decide which bank to apply with
- Choose account type (NRE/NRO/FCNR)
- Determine online or offline application
- Check computer/phone for video KYC capability
- Test internet connection speed
- Gather all required documents
- Make photocopies/scans of documents
- Arrange notarization if needed
Document Checklist
Identity Documents:
- Valid passport
- Passport color photocopy (all pages)
- Certified copy of passport (if required)
- Visa page copy
- Work permit copy (if applicable)
- Entry/exit stamps documented
Tax Documents:
- PAN card photocopy
- Form 60 (if no PAN) with affidavit
- Tax residency certificate (if needed)
- Tax return copies (2-3 years)
- Income documents
Address Documents:
- Foreign address proof (utility bill/lease)
- Indian address proof
- Both documents clear and recent
- Documents show full name and address
- Documents dated within 3 months
Photographs:
- Colored passport-size photographs
- Recent (within 6 months)
- White background
- Clear face visible
- At least 2-4 copies
Employment Documents:
- Employment letter from employer
- Salary certificate
- Salary slips (last 2-3 months)
- Employment contract copy
- Job description
- Reference letter from employer
Signature Documents:
- Notarized signature document
- Signature sample consistent
- Embassy attested signature (if required)
Miscellaneous:
- Bank statements (3-6 months)
- Proof of funds source
- Investment documents (if relevant)
- Business documents (if self-employed)
- Pension documents (if pensioner)
Application Form Checklist
Before Submission:
- All fields filled accurately
- Information matches documents
- Signatures in all required places
- Contact details verified
- Dates formatted consistently
- No corrections or corrections done neatly
- Form printed clearly
- Mandatory fields completed
- Declaration read and understood
- Signature notarized (if required)
Document Quality Checklist
Before Uploading/Submitting:
- All documents are clear and legible
- No shadows or darkness issues
- All text is readable
- Image quality is high (300+ DPI for scans)
- Passport pages are in color
- All four corners of document visible
- No water marks or damage
- File sizes appropriate
- Formats accepted by bank (PDF/JPG)
- Naming convention followed if specified
Video KYC Preparation
Technical Setup (1 day before):
- Test camera on device
- Test microphone quality
- Test internet speed (minimum 2 Mbps)
- Ensure good lighting
- Clean camera lens
- Close unnecessary applications
- Disable notifications
- Charge device completely
- Have backup power source ready
Document Preparation (1 day before):
- Have passport ready and accessible
- Have visa copy nearby
- Have address proof at hand
- Have PAN/Form 60 nearby
- Have photographs visible
- Have signature document ready
- Keep documents organized
Physical Preparation (30 minutes before):
- Wear professional appearance
- Remove sunglasses/hat
- Remove face mask (if applicable)
- Sit in clean, professional background
- Ensure good lighting on your face
- Remove background clutter
- Silence phone notifications
- Have pen ready for signature
Post-Submission Checklist
After Applying:
- Receive confirmation email
- Note application reference number
- Save confirmation documents
- Wait for video KYC scheduling
- Confirm video KYC appointment
- Keep tracking account on bank website
- Be available for bank queries
- Respond to any information requests promptly
- Keep documents safe until account confirmed
Account Activation Checklist
After Account Opening:
- Receive account number
- Receive welcome kit
- Verify account details
- Set up online banking username
- Generate OTP/password
- Download mobile app
- Log in and explore features
- Verify account balance
- Verify registered mobile number
- Register for alerts/notifications
- Update beneficiaries if needed
- Check debit card status
- Verify IFSC code
- Save important account numbers
Downloadable Checklists
The following checklists can be printed and used for reference during your application process.
Checklist 1: Complete Document Checklist
NRI ACCOUNT OPENING - COMPLETE DOCUMENT CHECKLIST
Bank: _________________ Account Type: _______________
Application Date: _____________ Reference Number: __________

IDENTITY & PASSPORT
□ Passport original (valid for 6+ months)
□ Photocopy of all passport pages (colored)
□ Certified copy of passport (if required)
□ Passport bio-data page clear
□ All visa stamps documented

VISA & WORK PERMIT
□ Current visa copy
□ Visa validity clearly visible
□ Work permit copy (if applicable)
□ Entry stamp in passport
□ Exit stamp (if leaving country)

FINANCIAL IDENTIFICATION
□ PAN card copy
□ PAN certificate
□ Form 60 (if no PAN)
□ Affidavit with Form 60
□ Notarization of Form 60

RESIDENCE & ADDRESS
□ Foreign address proof (recent)
□ Indian address proof
□ Proof dated within 3 months
□ Shows complete address
□ Shows full name on document

PHOTOGRAPHS
□ Colored photographs (2-4 copies)
□ Passport size (4x6 cm or 2x2 inches)
□ Recent (within 6 months)
□ White background
□ Clear face without obstruction

EMPLOYMENT DOCUMENTS
□ Employment letter from employer
□ Salary certificate
□ Last 2-3 salary slips
□ Employment contract copy
□ Job description document
□ Employer reference letter

SIGNATURE DOCUMENTS
□ Signature verification document
□ Notarized signature
□ Embassy attestation (if required)
□ Bank attestation (if required)

ADDITIONAL DOCUMENTS
□ Bank statements (3-6 months)
□ Proof of funds source
□ Self-declaration/undertaking
□ Birth certificate (if needed)
□ Investment documents (if applicable)
□ Business documents (if self-employed)
□ Pension documents (if pensioner)

FORM COMPLETION
□ Application form completed
□ All sections filled
□ Signatures in required places
□ No corrections (or corrected neatly)
□ Notarization done (if required)
□ Declaration understood and signed
Checklist 2: Bank-Specific Quick Reference
BANK: _________________ Account Type: _________________
Branch: _________________ City: _________________

BASIC INFORMATION
Application Method: □ Online □ Offline □ Both
Account Variant: □ Savings □ Salary □ Premium
Preferred Branch: _________________________________

TIMELINE TRACKING
Application Submitted: _____________
Video KYC Scheduled: _____________
Video KYC Completed: _____________
Account Approval: _____________
Account Activated: _____________
Debit Card Received: _____________

ACCOUNT DETAILS
Account Number: _______________________________
IFSC Code: _______________________________
Registered Mobile: _______________________________
Email Address: _______________________________
Branch Contact: _______________________________

MINIMUM BALANCE
Opening Balance Deposited: □ Yes □ No
Amount Deposited: Rs. _____________
Date Deposited: _____________
Ongoing Minimum Required: Rs. _____________

FACILITIES REQUESTED
□ Debit Card
□ Checkbook
□ Mobile Banking
□ Online Banking
□ Locker Facility
□ Forex Card
□ Investment Services

ADDITIONAL NOTES
_________________________________________________________
_________________________________________________________
_________________________________________________________
Checklist 3: Video KYC Preparation
VIDEO KYC PREPARATION CHECKLIST
Bank: _________________ Scheduled Date: _________________
Time: _________________ Duration: 15-20 minutes

TECHNICAL SETUP (1 DAY BEFORE)
□ Test camera and microphone
□ Test internet speed (minimum 2 Mbps)
□ Check lighting in chosen room
□ Clean camera lens
□ Close background applications
□ Charge device to 100%
□ Have backup power source

DOCUMENT SETUP (1 DAY BEFORE)
□ Passport organized and accessible
□ Visa pages marked and ready
□ Address proof easily retrievable
□ PAN/Form 60 nearby
□ Photographs at hand
□ Signature document visible
□ Pen ready for signature demonstration

ENVIRONMENT (30 MINUTES BEFORE)
□ Clean, professional background
□ White or neutral background
□ Adequate lighting on your face
□ No glare on glasses/eyes
□ Remove sunglasses/hat/mask
□ Professional appearance
□ No background clutter visible
□ Quiet environment (no noise)

DURING VIDEO KYC
□ Join 5 minutes early
□ Greet officer professionally
□ Keep documents within frame
□ Show passport all pages
□ Display visa clearly
□ Show address proof
□ Display PAN/Form 60
□ Demonstrate signature multiple times
□ Answer all questions directly
□ Confirm all details
□ Wait for completion confirmation

POST VIDEO KYC
□ Receive confirmation message
□ Note confirmation number
□ Expect account within 2-3 days
□ Contact bank if no update in 3 days
□ Check email for account details
Checklist 4: Common Issues Verification
COMMON ISSUES - VERIFICATION CHECKLIST
Use this to double-check before submission

DOCUMENTATION ISSUES
□ All passport pages included (not just bio page)
□ Photocopies are clear and readable
□ No blurred or partial images
□ Colored copies where required
□ All required documents included
□ No expired documents

ADDRESS VERIFICATION
□ Address proof is recent (within 3 months)
□ Document clearly shows full address
□ Document clearly shows your name
□ Address matches residence
□ Foreign address proof provided
□ Indian address proof provided

INFORMATION CONSISTENCY
□ Name matches across all documents
□ Date of birth consistent everywhere
□ Signature is consistent
□ Contact details are correct
□ No spelling variations
□ No abbreviations used

EMPLOYMENT & INCOME
□ Employment clearly documented
□ Employer details provided
□ Income source clear and verified
□ Salary documents attached
□ Employment contract provided
□ At least 6 months employment

FUNDS DOCUMENTATION
□ Source of opening funds clear
□ Bank statements provided
□ No suspicious transactions
□ Consistent deposit pattern
□ Fund source documented
□ Explanation provided if needed

TAX COMPLIANCE
□ PAN obtained or Form 60 submitted
□ Tax residency status clear
□ No tax compliance issues
□ Documents current and valid
□ Declaration signed and notarized
FAQs
Account Types
Q1: What is the difference between NRE and NRO accounts?
A1:
- NRE (Non-Resident External): For foreign income and funds earned outside India. Fully repatriable, tax-free interest, accepts foreign currency deposits.
- NRO (Non-Resident Ordinary): For income earned within India (rental, pension, dividends). Partially repatriable (limited to $1 million per year), taxable interest income, Indian rupee deposits only.
Q2: Can I have both NRE and NRO accounts?
A2: Yes, most NRIs open both accounts. NRE for foreign income and NRO for Indian income management. This separation helps with compliance and tax reporting.
Q3: What is FCNR account and who needs it?
A3: FCNR (Foreign Currency Non-Resident) is a fixed deposit account in foreign currency. Best for NRIs wanting to:
- Keep foreign currency savings
- Earn returns in stable currencies
- Avoid currency fluctuation risks
- Lock funds for fixed period (1-5 years)
Q4: Can I open an account without visiting India?
A4: Yes, most banks offer online account opening with Video KYC. You can complete the entire process from anywhere in the world.
Documents
Q5: I don't have a PAN card. Can I open an account?
A5: Yes, you can submit Form 60 (Declaration) instead of PAN. Form 60 should be:
- Notarized/attested
- Self-declaration by you
- Stating you don't have PAN
- Signed in front of notary public
Q6: My address proof is older than 3 months. Will it be accepted?
A6: Most banks require address proof within 3 months, but you can:
- Provide multiple recent documents
- Get a new utility bill
- Provide employment letter with address
- Provide bank statement showing address
- Contact bank to check acceptance
Q7: Do I need both foreign and Indian address proof?
A7: Technically, only foreign address is required (for NRI status). Indian address proof is optional but recommended if:
- You have property in India
- You have family in India
- You plan to visit India frequently
- You maintain ties with India
Q8: Can I use digital copies of documents?
A8: For online applications:
- Yes, high-quality digital scans are accepted
- Minimum 300 DPI for clarity
- Colored copies of important documents
- Clear and readable For offline applications:
- Originals for verification
- Photocopies for submission
Online Application
Q9: How long does online account opening take?
A9:
- HDFC: 4-6 business days
- ICICI/SBI: 5-7 business days
- Axis: 5-8 business days
- Kotak: 6-8 business days Timelines vary based on documentation completeness.
Q10: What if my internet connection fails during video KYC?
A10:
- Contact bank immediately
- Reschedule for another time
- Bank will provide new video link
- Previous KYC does not count
- You get another chance
- No penalty for technical issues
Q11: Can someone represent me during video KYC?
A11: No, video KYC is personal verification. You must:
- Attend video call personally
- Show your face clearly
- Verify your identity in person
- No proxy or representative allowed
- Exception only for legal guardians of minors
Q12: What questions are asked during video KYC?
A12: Typical questions include:
- "What is your current employment?"
- "What is your monthly income?"
- "Why are you opening account in India?"
- "What is your purpose of remittances?"
- "Do you have other bank accounts?"
- "What is your tax residency status?"
- "How did you get the opening funds?"
- Personal details verification
Funding & Balance
Q13: What is the minimum opening balance needed?
A13: Varies by bank:
- ICICI: Rs. 5,000-10,000
- HDFC: Rs. 5,000
- Axis: Rs. 5,000-10,000
- SBI: Rs. 0-5,000
- Kotak: Rs. 5,000
Q14: How can I send money from abroad to open the account?
A14: Methods include:
- International wire transfer (SWIFT) - 3-5 days
- NEFT/RTGS from other Indian accounts - same day
- Demand draft - 1-2 weeks
- Carry cash when visiting India
- Some banks allow deposit after account opening
Q15: What happens if I don't maintain minimum balance?
A15:
- Monthly maintenance charges imposed (Rs. 100-500)
- Reduced interest on deposits
- Limited service access
- Account may become dormant
- Better to upgrade to basic account if can't maintain
Q16: Can I start with NRE and add NRO later?
A16: Yes, many NRIs:
- Open NRE account first
- Add NRO account later
- Can be done at same or different branch
- Usually takes 2-3 days for second account
- Same documentation used
Specific Bank Questions
Q17: Which bank is best for NRI accounts?
A17: It depends on your needs:
- Speed: HDFC (4-6 days)
- Affordability: SBI
- Global Network: SBI
- Technology: ICICI
- Premium Service: HDFC
- Customer Service: HDFC
Q18: Can I open account with multiple banks?
A18: Yes, many NRIs have accounts with 2-3 banks:
- Diversifies banking services
- Access to different benefits
- Backup if one bank has issues
- Different transaction limits
- Each bank process separately
Q19: Is there any hidden charges in NRI accounts?
A19: Transparent charges include:
- Annual maintenance fee (if not waived)
- Transaction charges (NEFT/RTGS/SWIFT)
- Cheque book charges
- Locker rent (if applicable)
- Debit card fee (if not waived) Always ask bank for complete fee structure.
Q20: Can I get overdraft facility on NRI account?
A20:
- Limited overdraft available
- Requires meeting eligibility criteria
- Usually not available immediately
- Can apply after 6 months of active account
- Salary account holders get better terms
- Check with specific bank for policies
Returns & Interest
Q21: How is interest calculated on NRE account?
A21:
- Similar to resident accounts
- Current rates: 0.5% - 2% (varies)
- Tax-free interest (as per current law)
- Credited quarterly
- Rates change periodically
- Check bank website for current rates
Q22: Is interest on NRO account taxable?
A22: Yes:
- Subject to Indian income tax
- TDS (Tax Deducted at Source) applicable
- If income exceeds threshold, ITR required
- Current rates: 2% - 4% (varies)
- Net return after tax is lower
Q23: Which provides better returns - NRE or NRO?
A23:
- NRE: Lower interest but tax-free
- NRO: Higher interest but taxable
- Effective return depends on your tax bracket
- If in high tax bracket: NRE may be better
- If in low tax bracket: NRO may be better
- Discuss with tax advisor
Repatriation & Remittances
Q24: Can I send money from India to abroad as NRI?
A24:
- From NRE: Fully repatriable, no limit
- From NRO: Limited to $1 million per financial year
- Requires RBI approval for large amounts
- Need supporting documents
- SWIFT transfer takes 3-5 days
Q25: What documents needed for fund repatriation?
A25:
- Income proofs (salary, business)
- Loan repayment documents (if applicable)
- Investment proofs (if investing abroad)
- Passport/visa copy
- Form A2 or LRS (Liberalized Remittance Scheme)
- Bank's repatriation form
Q26: How much can I remit annually from NRO?
A26:
- Maximum: $1 million per financial year
- Beyond this requires RBI approval
- Can carry cash up to $10,000 (declare to customs)
- Better to use NRE account for regular remittances
- Keep records and documentation
Account Closure & Changes
Q27: Can I close my NRI account if I return to India?
A27: Yes, but you should:
- Inform bank of resident status
- Convert NRI account to resident account
- Close old account (optional)
- New account may be needed
- Process takes 5-7 days
- Return all debit cards/checkbooks
Q28: What happens to my account if I change jobs/country?
A28:
- Account remains active if NRI status continues
- Address can be updated
- Provide new employment letter
- Update bank with new residence
- No closure needed unless returning to India
Q29: Can NRI account be made joint?
A29:
- Yes, some banks allow joint accounts
- Both holders must be NRIs
- Or one NRI + one Indian resident (in some banks)
- Both must complete KYC
- Same documentation requirements
- Check with specific bank
Q30: Can I access my NRI account while visiting India?
A30: Yes:
- Full access available
- Can withdraw cash from ATMs
- Can make deposits
- Can visit branch
- Cheques are valid
- No restrictions on visiting India
Special Situations
Q31: I'm a student in foreign country. Can I open NRI account?
A31: Yes, students can open account:
- With student visa proof
- Require sponsor documentation
- May have lower balance requirements
- International transfer for tuition possible
- Some banks have special student packages
Q32: I'm a pensioner. Are there any special benefits?
A32: Yes, pensioners get:
- Waived minimum balance requirements
- Lower or zero maintenance fees
- Special interest rates
- Priority customer service
- Dedicated pensioner helpline
- Monthly pension credit guaranteed
Q33: I'm self-employed. What additional documents needed?
A33: Self-employed applicants need:
- Business registration documents
- Tax returns (2-3 years minimum)
- Business bank statements (6 months)
- Business address proof
- Partnership deed (if applicable)
- Business license/certificate
- Client list or portfolio
Q34: What if I have dual citizenship?
A34:
- You're NRI if no Indian residential address
- Provide both passports if applicable
- Choose one for account opening
- Declare status clearly
- No conflicts but needs clarity
- Mention all citizenships to bank
Q35: Can my spouse open NRI account with different bank?
A35: Yes:
- Each person opens separate account
- Each provides own documentation
- Accounts are independent
- No automatic joint access
- Can be at different banks
- Easy fund transfer between spouse accounts
Technology & Digital
Q36: How do I use online banking from abroad?
A36:
- Set up user ID on bank website
- Generate OTP using mobile number
- Access from anywhere internationally
- Use VPN if restricted in country
- Mobile app available
- 24/7 access from anywhere
Q37: Can I set up recurring payments/transfers?
A37: Yes:
- NEFT/RTGS schedules available
- Recurring payment options
- Standing instructions
- Bill pay facilities
- But limited for international transfers
- Check bank-specific features
Q38: What security features should I use?
A38: Essential security:
- Set strong password
- Use two-factor authentication
- Don't share OTP with anyone
- Update phone number promptly
- Use secure Wi-Fi for transactions
- Enable transaction alerts
- Register beneficiaries carefully
FAQs Summary
Quick Answer References:
Need account fast? Use HDFC (4-6 days) Need affordability? Use SBI Need global network? Use SBI Need premium service? Use HDFC Need technology? Use ICICI Have no PAN? Use Form 60 with affidavit Need both accounts? Open NRE + NRO Have questions? Contact bank's NRI helpline
Conclusion
Opening an NRI bank account is a crucial step in managing your finances as a Non-Resident Indian. With the information provided in this comprehensive checklist, you should be well-equipped to:
- Understand the different account types and their features
- Gather all necessary documentation
- Choose the right bank for your needs
- Complete the application process smoothly
- Prepare for video KYC
- Avoid common rejection reasons
- Manage your account effectively after opening
Next Steps
- Select Your Bank: Review the comparison table and choose based on your priorities
- Gather Documents: Use the master checklist to prepare all documentation
- Apply Online: Most banks recommend online application for speed and convenience
- Prepare for Video KYC: Follow the preparation checklist for smooth verification
- Maintain Account: Keep minimum balance and manage actively
- Explore Services: Use debit card, mobile banking, and investment products
Additional Resources
For more information, visit:
- Individual bank websites for NRI services
- RBI official website for NRI regulations
- NRI Wealth Partners for personalized guidance
- Your bank's NRI helpline for specific queries
Contact NRI Wealth Partners
For expert guidance on NRI financial matters:
- Website: www.nriwealthpartners.com
- Email: support@nriwealthpartners.com
- Phone: +91-XXXX-XXXX-XXXX
- WhatsApp: +91-XXXX-XXXX-XXXX
Document Version: 1.0 Last Updated: December 2024 Next Review: June 2025
Disclaimer: This document is for informational purposes only and does not constitute legal or financial advice. Bank policies and RBI regulations may change. Always consult with your bank and a qualified financial advisor for specific situations. NRI Wealth Partners does not guarantee accuracy of all information and recommends verification with official sources.
NRI Wealth Partners Simplifying Finance for Non-Resident Indians Worldwide
© 2024 NRI Wealth Partners. All rights reserved.